# 前言
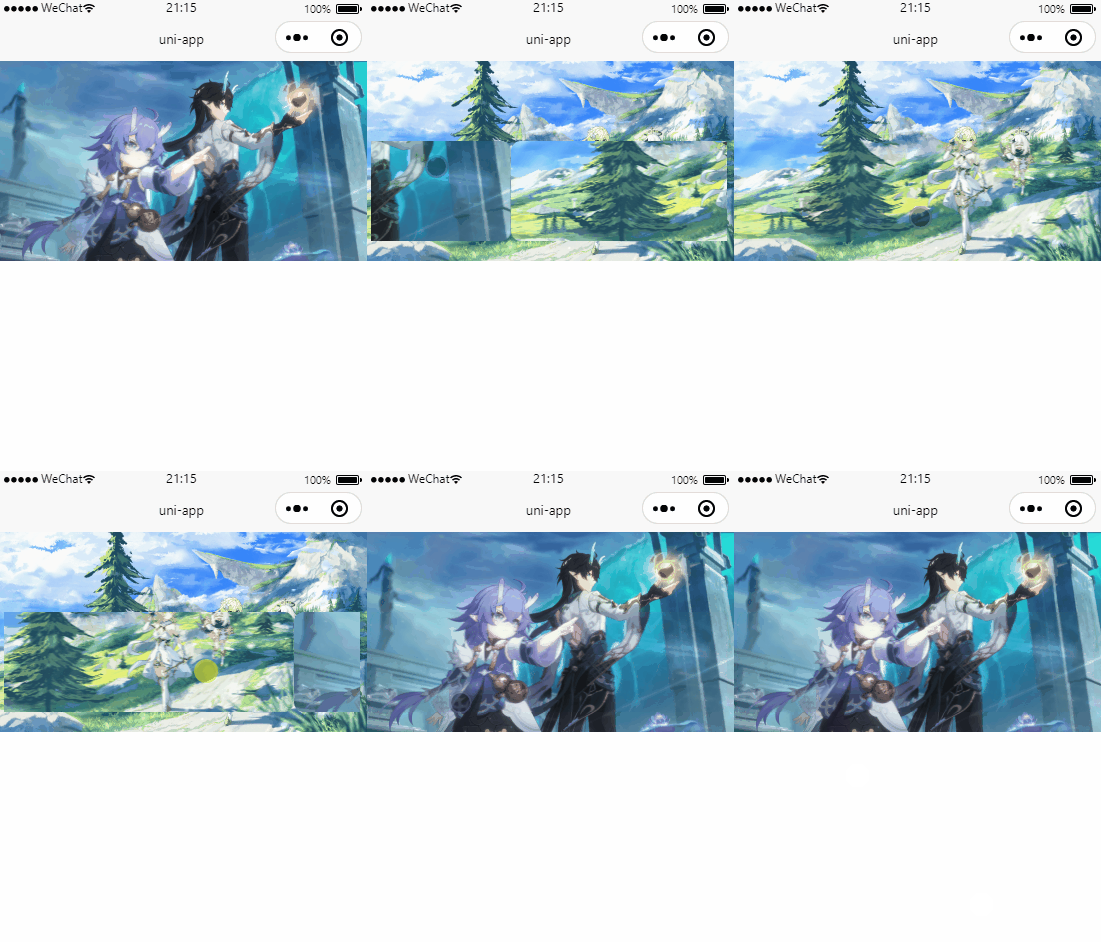
今天用uniapp和swiper插件来写一个轮播效果,即轮播组件有一个背景,当轮播图变化时,背景图跟着改变,轮播图和背景图内容是一样的,且看上去是一体的。
说起来可能有点抽象,打个比方就是有一张大卡片,有一张小卡片叠在大卡片的上面,这两张卡片颜色相同。这个小卡片的颜色会自动变化,当小卡片颜色变化时,大卡片的颜色也随着变化成一样的。
这里的小卡片就是轮播组件,大卡片就是背景图,本次效果比颜色变化要更难一点,需要视觉上看上去就是一张图片而没有切割的现象。
Hbuilder创建项目很简单,直接左上角创建项目选择默认模板和vue3就能创建了。
轮播组件小程序自带也很方便,但写来写去轮播组件里面的图位置老是不对(业务写多了最基础的css反而生疏了),并且伴随各种缩放问题(其实是我找的图大小不一样导致的)。
最后只能从网上看看别人是怎么实现的,但网上却很少有类似的案例,大部分都是背景颜色跟着改变的,最后终于在b站(没错就是学习网站)上找到一个案例,链接如下: 仿沃尔玛首页实现轮播图和背景图双重切换(背景音乐版) (opens new window)
看完视频我受益良多,也跟着复刻了一次,但实现方式比较复杂和麻烦,需要将一张图切成3张,分别是上、下和轮播图的部分,然后把各部分图片拼上去,切图也比较讲究,大小一定要切好,否则效果也不理想。
但是该up主也指明了另一个方向,只需要加载一张图片,那就是你所有展示图片的部分,给图片加上一个盒子,然后通过absolute定位来调整图片的展示区域。
这让我想到了另外一种方式,那就是用background-position来调整图片展示的位置,最后也是成功写了出来,和up主说的这种方式也是有异曲同工之妙吧,都是通过定位来解决。
# 代码实现
<template>
  <view class="bg" :style="{backgroundImage: 'url(' + list[curIndex] + ')'}">
    <swiper @change="onChange" circular autoplay class="my-swiper">
      <swiper-item v-for="item in list">
        <view class="my-swiper-item" :style="{backgroundImage: 'url(' + item + ')'}"></view>
      </swiper-item>
    </swiper>
  </view>
</template>

<script>
  export default {
    data() {
      return {
        list: [
          '/static/s0.png',
          '/static/s1.png'
        ],
        curIndex: 0
      }
    },
    onLoad() {

    },
    methods: {
      onChange(e) {
        console.log(e)
        this.curIndex = e.detail.current
      }
    }
  }
</script>

<style>
  .bg {
    width: 100%;
    height: 400rpx;
    position: relative; /*给轮播组件定位用*/
    overflow: hidden;
    background-size: cover;
  }
  .my-swiper{
    width: 95%;
    height: 200rpx;
    position: absolute;
    top: 160rpx;
    left: 50%;
    transform: translateX(-50%);
  }
  .my-swiper-item {
    width: 100%;
    height: 100%; /*将图片限制在轮播容器内*/
    background-size: auto 400rpx; /*图片宽高 注意至少要有1个值和背景图片是同等大小的 这里也可以写750rpx auto 但不能写百分比 因为其父级的宽高并不是背景图的宽高 写了的话图片会被压缩*/
    background-position: center -160rpx; /*图片位置 选取水平中间位置 以及垂直距离顶部160rpx的位置*/
  }
</style>
2
3
4
5
6
7
8
9
10
11
12
13
14
15
16
17
18
19
20
21
22
23
24
25
26
27
28
29
30
31
32
33
34
35
36
37
38
39
40
41
42
43
44
45
46
47
48
49
50
51
52
53
54
55
56
核心思路:通过动态样式来修改容器的背景图片。
重点:
图片选取要规范,这里用了rpx单位,并且选取iphone6尺寸作为标准来设计选取图片。 在iphone6的标准下,1物理像素(可以理解为在ps中的像素)=1rpx=0.5px,也就是说1px为2物理像素,而iphone6的宽为375px等于750物理像素,那么我们背景图宽度就可以定为750个物理像素,这样在计算的时候就很方便。
了解background-position的取值含义。background-position的取值有3种方式,百分比、具体值和位置单词如center,以y轴来说,top等于0%,center等于50%,而bottom则等于100%。一般我们设置2个值,分别代表x和y轴(看成第四象限,左上角为起点),那么这两个值则是代表将背景图片的起点往对应的方向的位移。 其中百分比也是可以计算为具体值的,公式为:
positionX = (容器的宽度-图片的宽度) * percentX;
positionY = (容器的高度-图片的高度) * percentY;
1
2如在上面的代码中,容器宽度为750rpx*95%=712.5rpx,图片的宽度为750rpx,center含义是50%,代入公式.my-swiper-item中的background-position就是 -18.75rpx -160rpx。
没错,算出来居然还是个负数,也就是图片在水平方向上向左移。
上面提到的up主的两种实现方式(微信小程序实现):
- 把一张图切成三部分(不推荐):
<view style="width: 100%; height: 120px; background: red; position: relative;">
    <!-- 背景图片 -->
    <image src="{{bg1}}" style="width: 100%; height: 100%; position: absolute;"/>
</view>
<!-- 相对定位,作为背景图片取宽高的上级。flex布局,将轮播图居中 -->
<view style="width: 100%; height: 180px; background: red; position: relative; display: flex; flex-direction: column; justify-content: center; align-items: center;">
    <!-- 背景图片 -->
    <image src="{{bg2}}" style="width: 100%; height: 100%; position: absolute;"/>
    <swiper bindchange="swiperChange" autoplay="{{true}}" circular="{{true}}"
            style="width: 95%; height: 100%; margin-bottom: 10px;">
        <swiper-item wx:for="{{swiperList}}">
            <image src="{{item.center}}" style="width: 100%; height: 100%; border-radius: 10px;"/>
        </swiper-item>
    </swiper>
</view>
2
3
4
5
6
7
8
9
10
11
12
13
14
15
- 通过绝对定位(推荐):
<view style="width: 100%; height: 395rpx; position: relative;">
	<image src="/static/s0.jpeg" style="width: 100%; height:100%; position: absolute; left: 0; top: 0; z-index: 1;"></image>
	<swiper style="width: 95%; height: 200rpx; border: 1px solid red; position: absolute; top: 150rpx; left: 50%; transform: translateX(-50%); z-index: 2;">
    <swiper-item>
			<image src="/static/s0.jpeg" style="width: 750rpx; height: 395rpx; position: absolute; top: -150rpx; left: 50%; transform: translateX(-50%);"></image>
		</swiper-item>
	</swiper>
</view>
2
3
4
5
6
7
8
js部分就不贴了,控制一下轮播和背景图片切换即可。
第一种方式里面的bg1是上半部分背景,bg2是下半部分,而item.center则是中间部分,也就是轮播图。
第二种方式需要注意轮播图的大小设置需要和背景图一致,通过绝对定位来实现展示局部位置,思路和用背景图片+background-position差不多,但需要注意层级设置,背景图是最底层,上面才是轮播组件。
# 效果图

