
# 前言
今天来探讨一下嵌套组件生命周期钩子的调用顺序,这也是很常见的面试题之一,而了解嵌套的生命周期钩子调用顺序也有助于我们开发。这些钩子看起来很简单,但在嵌套组件的情况下,可能没有你想象中那么简单。
由于vue3的生命周期钩子中少了beforeCreate和create钩子,先用vue2来测试一下。
# 代码
首先把简单的代码写好,只有父子组件:
// 父组件
<template>
  <div v-if="isShow" id="app">
    父组件input:<input v-model="input"/>
    <button @click="isShowChild = !isShowChild">{{isShowChild ? '隐藏' : '显示'}}子组件</button>
    <button @click="selfDestory">boom!</button>
    <HelloWorld v-if="isShowChild" :msg="input" @childCount="handleChildCount"/>
    <h3>{{childCount}}</h3>
  </div>
</template>

<script>
import HelloWorld from './components/HelloWorld.vue'

export default {
  name: 'App',
  components: {
    HelloWorld
  },
  data() {
    return {
      input: '',
      isShowChild: true,
      isShow: true,
      childCount: null
    }
  },
  methods: {
    selfDestory() {
      this.isShow = false
      // 确保在调用 this.$destroy 之前,所有的 DOM 更新操作都已经完成
      this.$nextTick(() => {
        this.$destroy()
      })
    },
    handleChildCount(value) {
      this.childCount = value
    }
  },
  beforeCreate() {
    console.log("父组件beforeCreate")
  },
  created() {
    console.log("父组件created")
  },
  beforeMount() {
    console.log("父组件beforeMount")
  },
  mounted() {
    console.log("父组件mounted")
  },
  beforeUpdate() {
    console.log("父组件beforeUpdate")
  },
  updated() {
    console.log("父组件updated")
  },
  beforeDestroy() {
    console.log("父组件beforeDestroy")
  },
  destroyed() {
    console.log("父组件destroyed")
  }
}
</script>

// 子组件
<template>
  <div class="hello">
    <h1>{{ msg }}</h1>
    子组件input:<input v-model="input"/>

    <button @click="handleCount">{{count}}</button>
  </div>
</template>

<script>
export default {
  name: 'HelloWorld',
  props: {
    msg: String
  },
  data() {
    return {
      input: '',
      count: 0
    }
  },
  methods: {
    handleCount() {
      this.count++
      this.$nextTick(() => {
        this.$emit('childCount', this.count)
      })
    }
  },
  beforeCreate() {
    console.log("子组件beforeCreate")
  },
  created() {
    console.log("子组件created")
  },
  beforeMount() {
    console.log("子组件beforeMount")
  },
  mounted() {
    console.log("子组件mounted")
  },
  beforeUpdate() {
    console.log("子组件beforeUpdate")
  },
  updated() {
    console.log("子组件updated")
  },
  beforeDestroy() {
    console.log("子组件beforeDestroy")
  },
  destroyed() {
    console.log("子组件destroyed")
  }
}
</script>
2
3
4
5
6
7
8
9
10
11
12
13
14
15
16
17
18
19
20
21
22
23
24
25
26
27
28
29
30
31
32
33
34
35
36
37
38
39
40
41
42
43
44
45
46
47
48
49
50
51
52
53
54
55
56
57
58
59
60
61
62
63
64
65
66
67
68
69
70
71
72
73
74
75
76
77
78
79
80
81
82
83
84
85
86
87
88
89
90
91
92
93
94
95
96
97
98
99
100
101
102
103
104
105
106
107
108
109
110
111
112
113
114
115
116
117
118
119
120
121
122
# 测试
然后把服务跑起来,一进页面就能看到控制台输出如下:
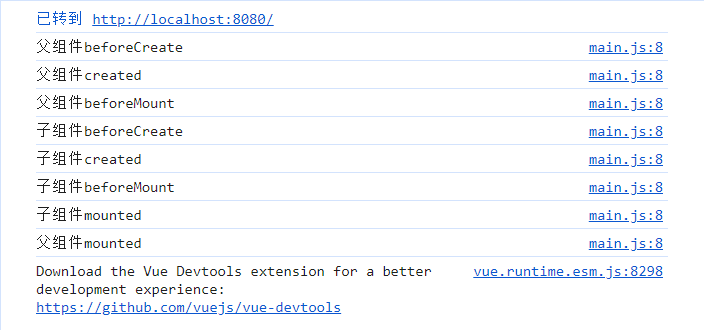
可以看到这个顺序也是比较符合我们的直觉的,父组件创建之后在挂载之前,需要等待子组件都创建挂载完,父组件才算挂载完。
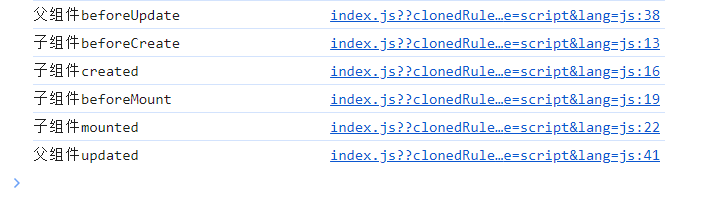
然后注意看我在父子组件中都写了一个input,并且都进行了v-model绑定,同时父组件输入的内容还会传递到子组件中进行展示。那么当父组件输入内容时,生命周期钩子的调用顺序是如何呢?请看下图:

类似一个递归结构,从外到里再从里到外。
那么当子组件中的input内容发生改变时,是否也是同样的结果呢?答案是不一样的,结果只输出了子组件的beforeUpdate和updated,父组件并没有参与。同样的,父组件没有把input的值传递给子组件展示的话,结果也会只展示父组件的更新钩子。
那么如果反过来,父组件中展示子组件传过来的值,如代码中的子组件中的计数器,每次增加之后都会通过emit把值传递给父组件进行展示,那么执行顺序是什么样的呢?请看下图:

答案是子组件完全更新之后才会触发父组件的更新。
从这些例子就能看出,需要父子组件之间有进行通信(注:本文中说的通信指的是会引起页面更新的通信,也就是页面要有渲染更新的值,如果值更新但是没有渲染时不会触发更新钩子的),并且通信的依赖发生改变,才会同时触发父组件和子组件的生命周期钩子,并且还会因为情况不同而导致执行顺序不同。
然后是点击隐藏子组件按钮,结果输出如下:

可以看到,销毁子组件也会触发父组件的更新。
点击显示子组件,结果大家也能猜出来,但是别忘了有个创建和挂载的过程哦:
最后点击boom!按钮,也就是销毁父组件,结果如下:
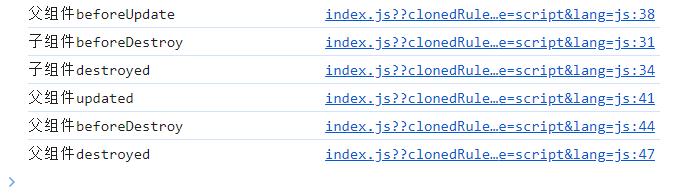
这里也可以看到组件销毁的过程,是子组件先销毁,最后才销毁父组件,并且在销毁子组件之前还会触发父组件的更新钩子,这点可能容易遗漏。
vue3的生命周期钩子和vue2大同小异,只不过setup中就包含了beforeCreate和created这两个钩子,经过测试和vue2的执行顺序是一致的。
# 总结
通过测试,可以总结一下vue2中嵌套组件生命周期的执行顺序:
- 父组件beforeCreate
- 父组件created
- 父组件beforeMount
- 子组件beforeCreate
- 子组件created
- 子组件beforeMount
- 子组件mounted
- 父组件mounted
- 父组件beforeUpdate(这里仅代表由父组件引起的更新并且与子组件有通信时的情况)
- 子组件beforeUpdate
- 子组件updated
- 父组件updated
- 父组件beforeUpdate(子组件销毁会触发父组件的更新钩子)
- 子组件beforeDestroy
- 子组件destroyed
- 父组件updated
- 父组件beforeDestroy(子组件完全卸载才开始销毁父组件)
- 父组件destroyed
大部分顺序都比较符合我们的直观感受,从里到外再从外到里,但是有些情况也容易记错,如:
- 在组件创建挂载时的顺序,应该注意是父组件完全创建完,在挂载之前才去创建子组件。
- 组件更新时会因为引起更新的组件的不同产生不同的顺序。若父子组件没有进行通信,那么只会触发各自的更新钩子。如果父子组件之间有通信,那么还有两种情况:①是由父组件引起的更新,这时会触发父子子父的顺序;②是由子组件引起的更新,这时会触发子子父父的顺序。
- 子组件销毁时会触发父组件的更新钩子,并且是子组件完全销毁后才触发父组件的beforeDestory。